eden
Environmental Compliance Platform
Getting around
Eden
Where everything is, for a regulated company and its team.
Every picture is taken from the running system.
Version 1.0 · October 2026 ·
for companies
Contents
Finding your way around
Your first screen
Recording your monitoring
Filing with your regulator
Finding your way around
Every screen in Eden has the same three parts, in the same places. Learn them
once and the rest of the system is a matter of knowing which name to look for
in the left-hand list.
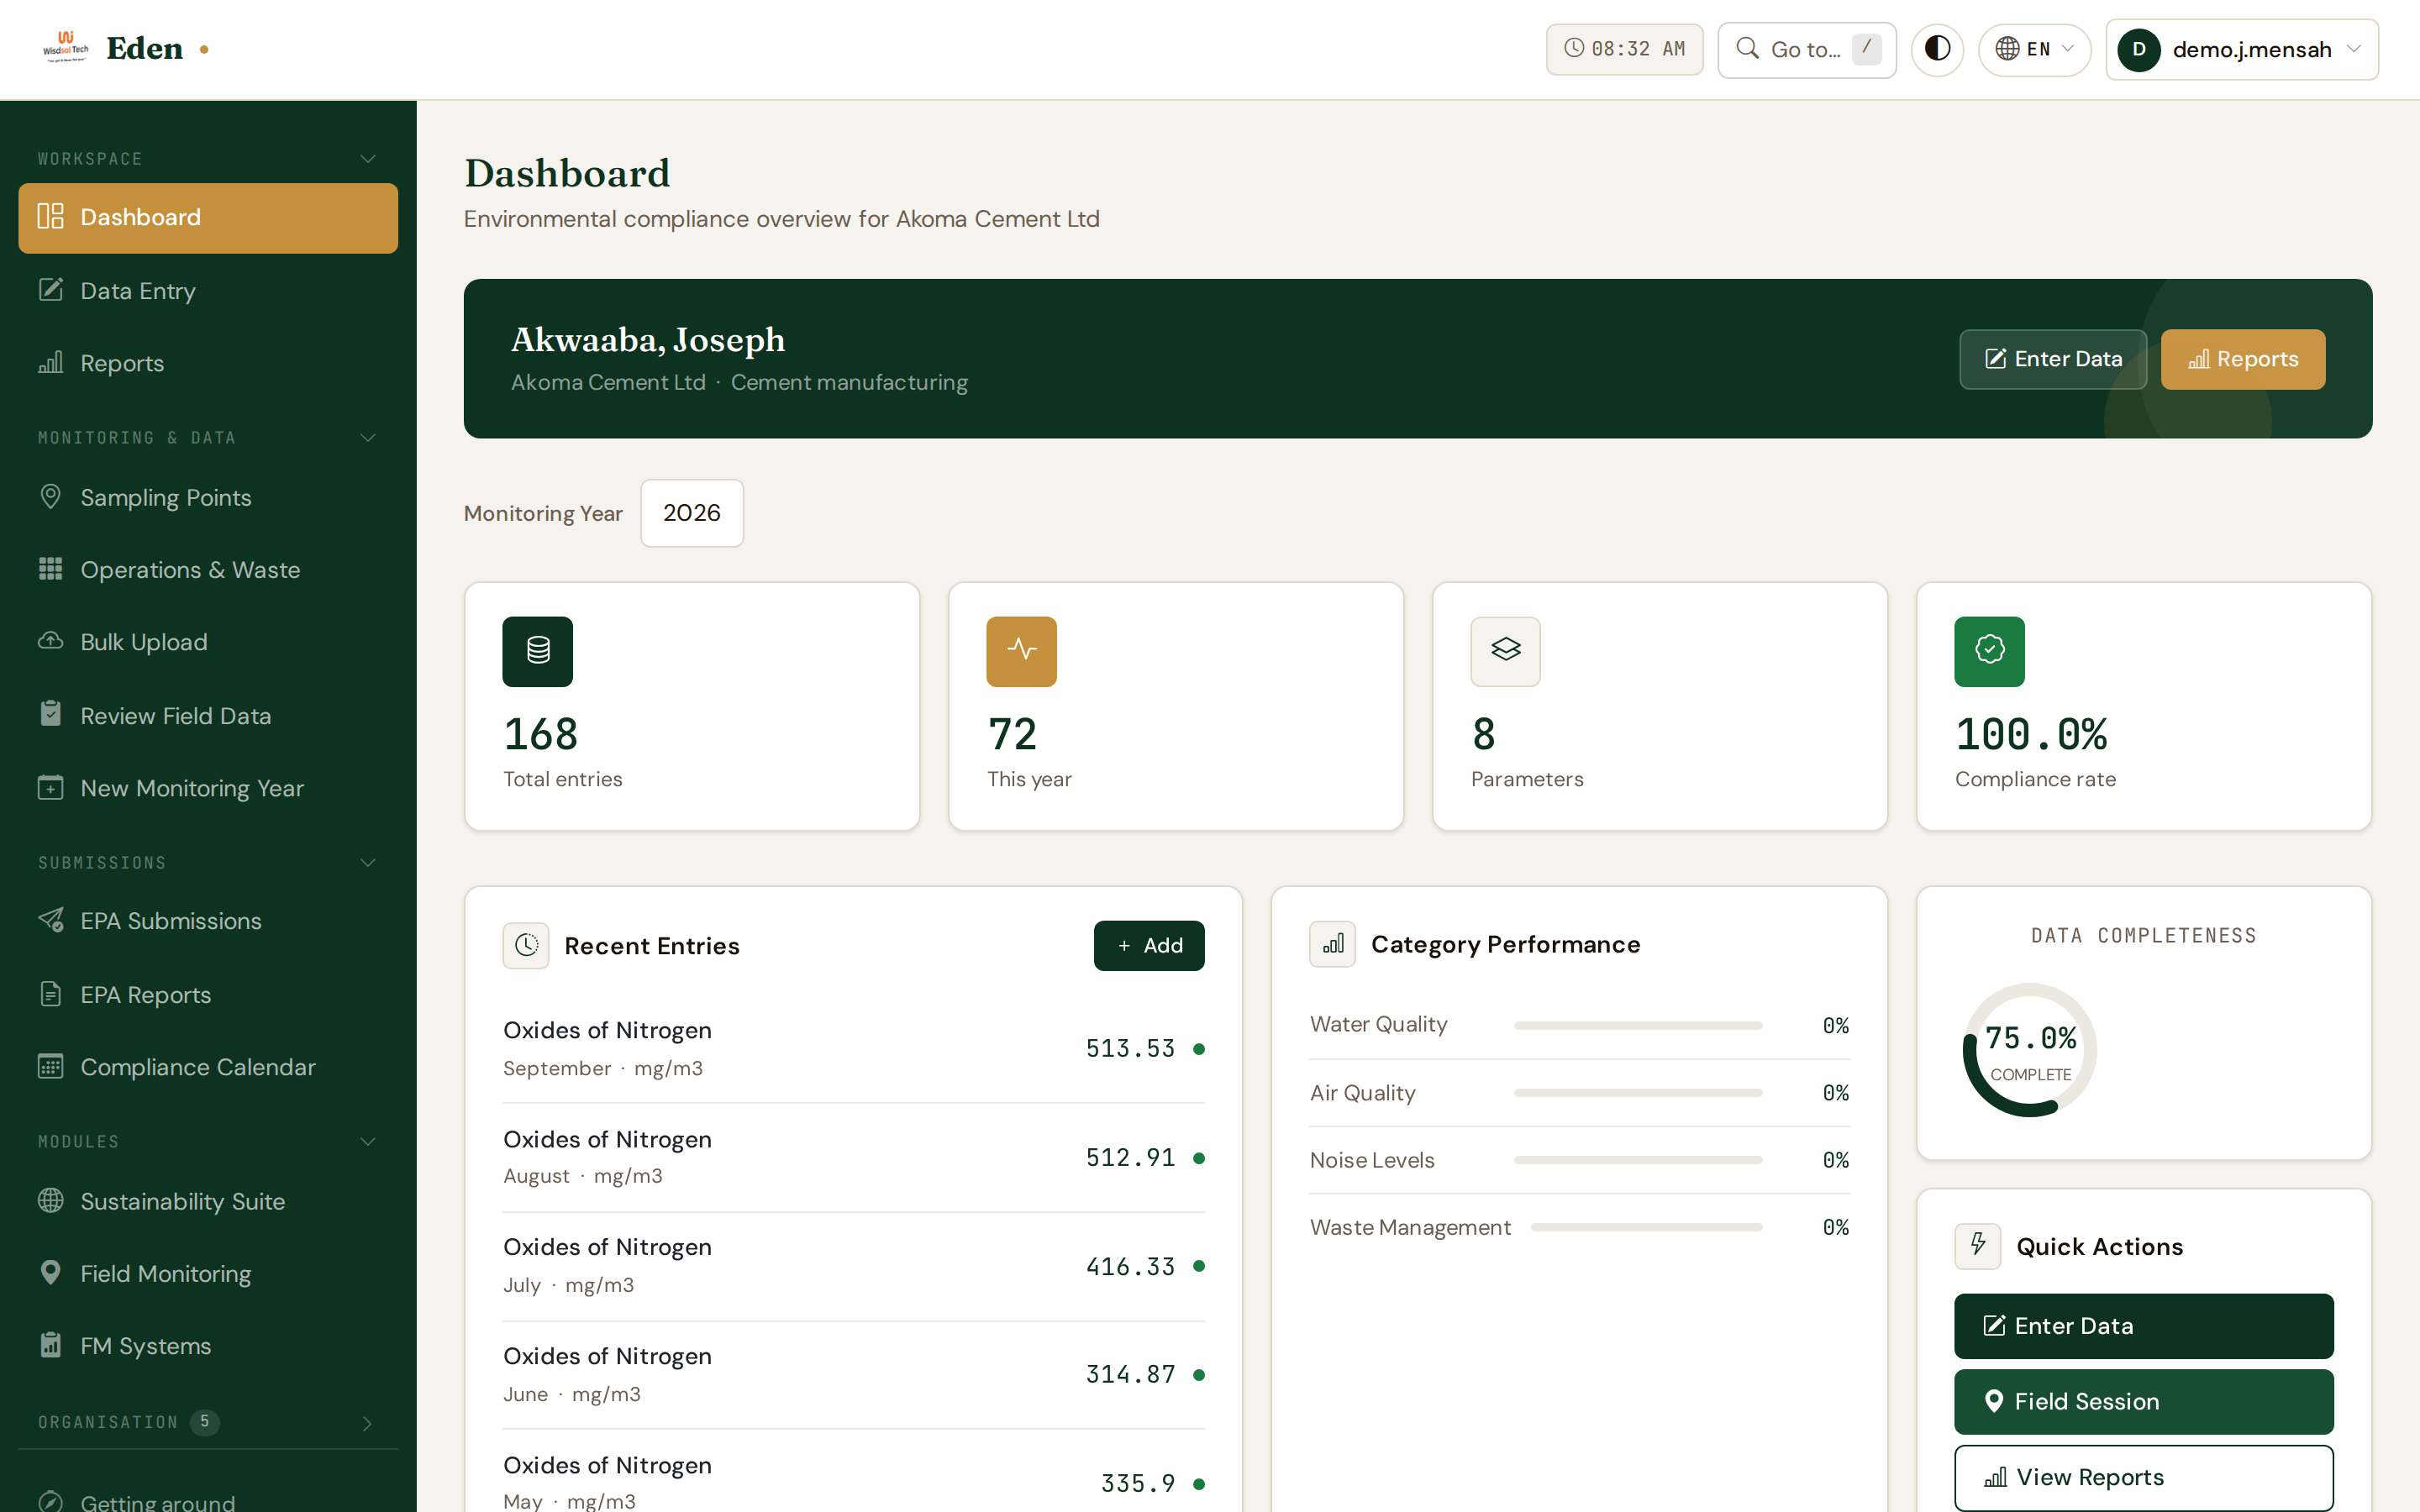
The screen, part by part
This is what you see after signing in. The bar across the top stays the same
everywhere you go; the dark column on the left is how you move between
screens; everything else is the screen you are currently on.
 1
2
3
4
5
6
7
8
9
1
2
3
4
5
6
7
8
9
The whole screen, named part by part. · /dashboard/
- 1The Eden mark. Click it at any point to go back to the public site — it never loses your work, because your work is saved as you enter it.
- 2The current time, in your own time zone. Useful when a submission is due by a particular hour.
- 3Light or dark. It cycles through follow-my-device, light and dark, and your choice follows your account to any computer or phone you sign in on.
- 4The language Eden speaks to you in. Changing it changes the words, never the data.
- 5Go to: type part of the name of any screen — "permits", "water", "surveys" — and press Enter. It searches every module your organisation has switched on, and remembers what you opened recently. Press / from anywhere to open it.
- 6Your account. The menu underneath it holds your profile, your password and the way out.
- 7The navigation column. Everything you can open is in here, grouped by what it is for.
- 8The name of the screen you are on, so you can always tell where you have ended up.
- 9The screen itself. This is the only part that changes as you move around.
Nothing on the top bar changes what your company has recorded. It is there to
tell you where you are and who you are signed in as.
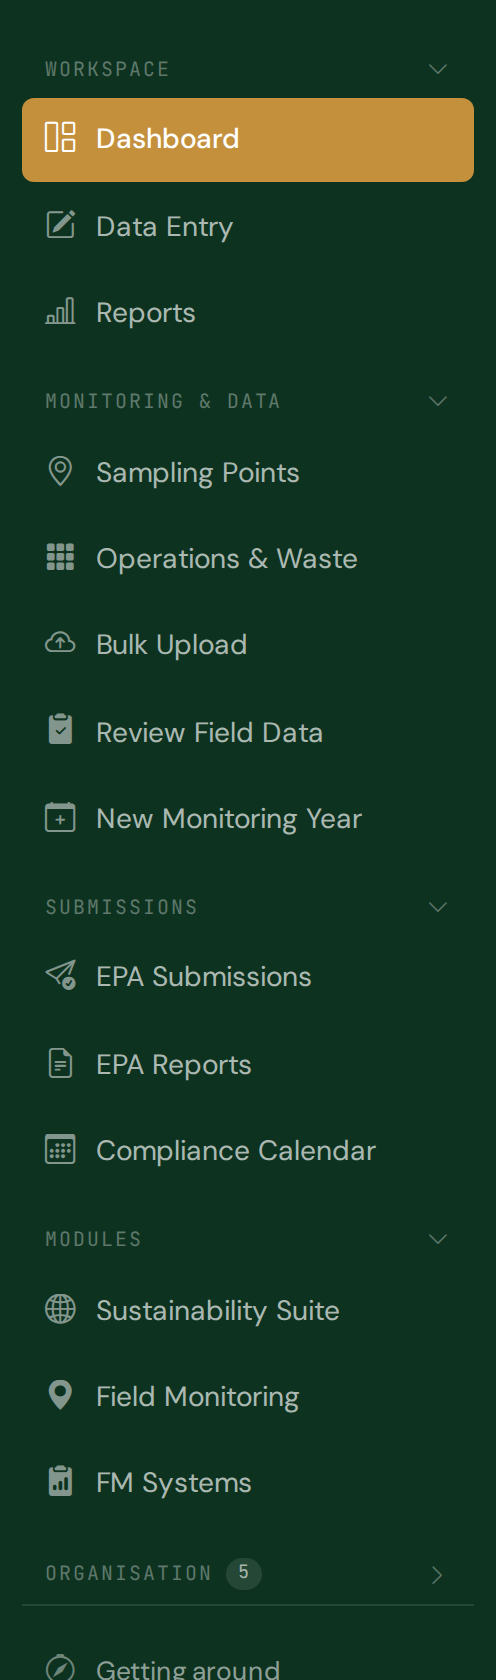
The navigation column
The column is folded into groups. A group holds the screens that belong
together, and you can close the ones you do not use so the list stays short.
 1
2
3
4
5
1
2
3
4
5
The sidebar on its own. · /dashboard/
- 1A group heading. Click it to fold the group away; click again to open it. Eden remembers which groups you folded, on this device.
- 2The screen you are on is highlighted, so a glance tells you where you are without reading the page.
- 3Modules holds the parts of Eden beyond monthly monitoring — the sustainability suite, field work and the field monitoring systems.
- 4The written manual, which explains what each screen means. This guide is about getting to them; that one is about what they are for.
- 5Shrinks the whole column to icons, for a wider working area. The square-bracket key does the same thing. Hover an icon to see its name.
Do this
- Click a group heading to fold it.
- Press [ to collapse the column to icons.
- Press [ again, or click Expand, to bring the names back.
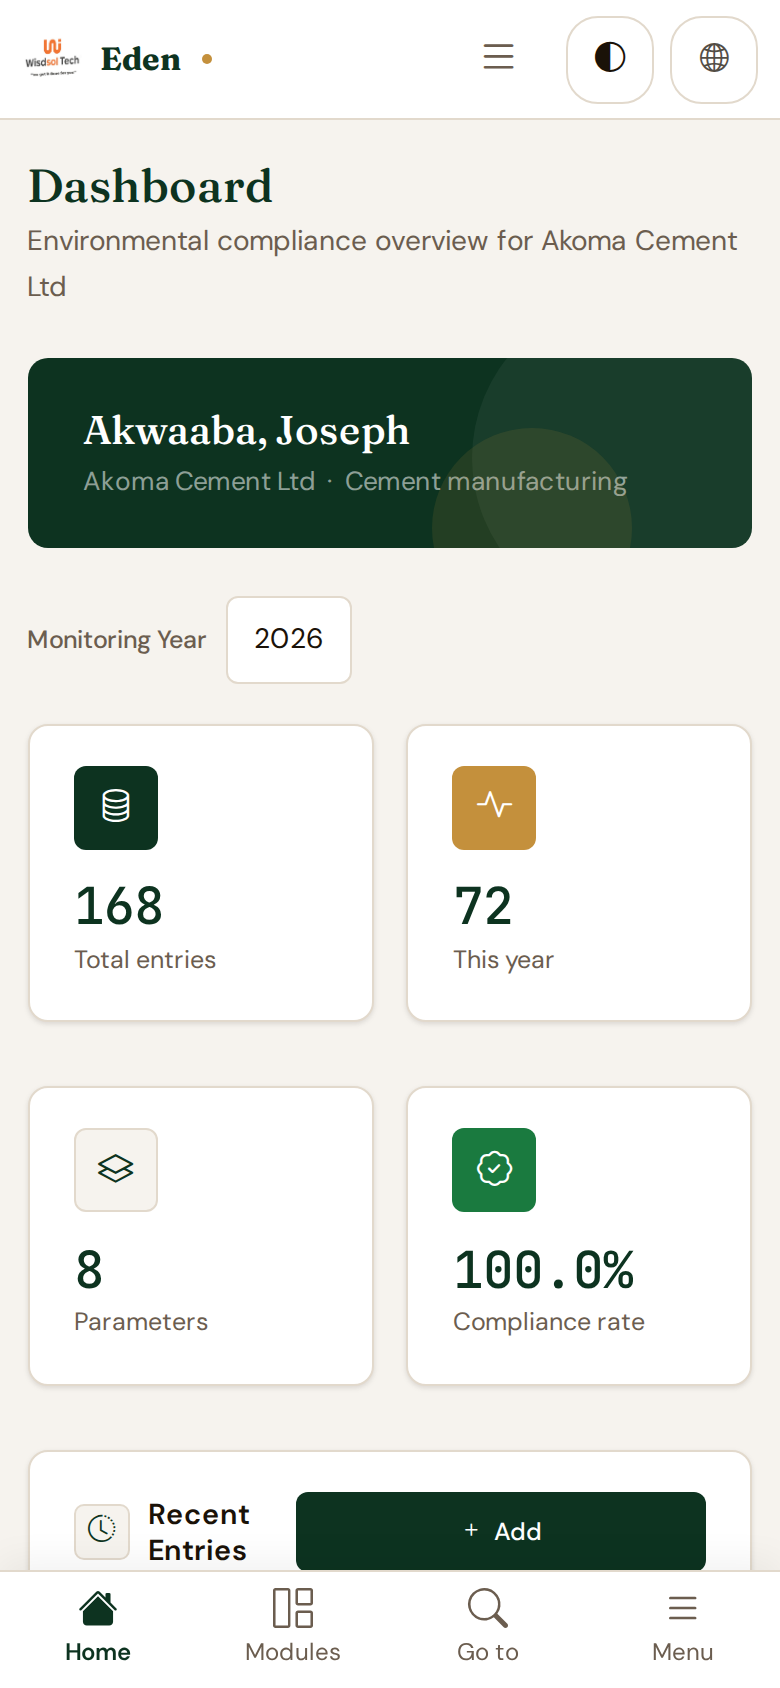
On a phone
On a phone there is no room for the column, so the four places people go most
sit in a bar along the bottom of the screen, within reach of a thumb. Appearance
and language stay on the bar at the top.
 1
2
3
4
5
6
1
2
3
4
5
6
The same screen on a phone. · /dashboard/
- 1Home: your dashboard, from anywhere.
- 2Modules: the sustainability suite and every module your organisation has switched on.
- 3Go to: type part of a screen's name and tap it — the quickest way to anything that is not on the screen you are looking at.
- 4Menu: slides in the same navigation list the column holds on a computer. Tap outside it to close it.
- 5Light or dark, in the same place as on a computer.
- 6Language, likewise.
Eden can be installed on a phone so it opens like any other app, from the
home screen, and keeps working where the signal does not. The written manual
has the steps for each kind of phone.
Your first screen
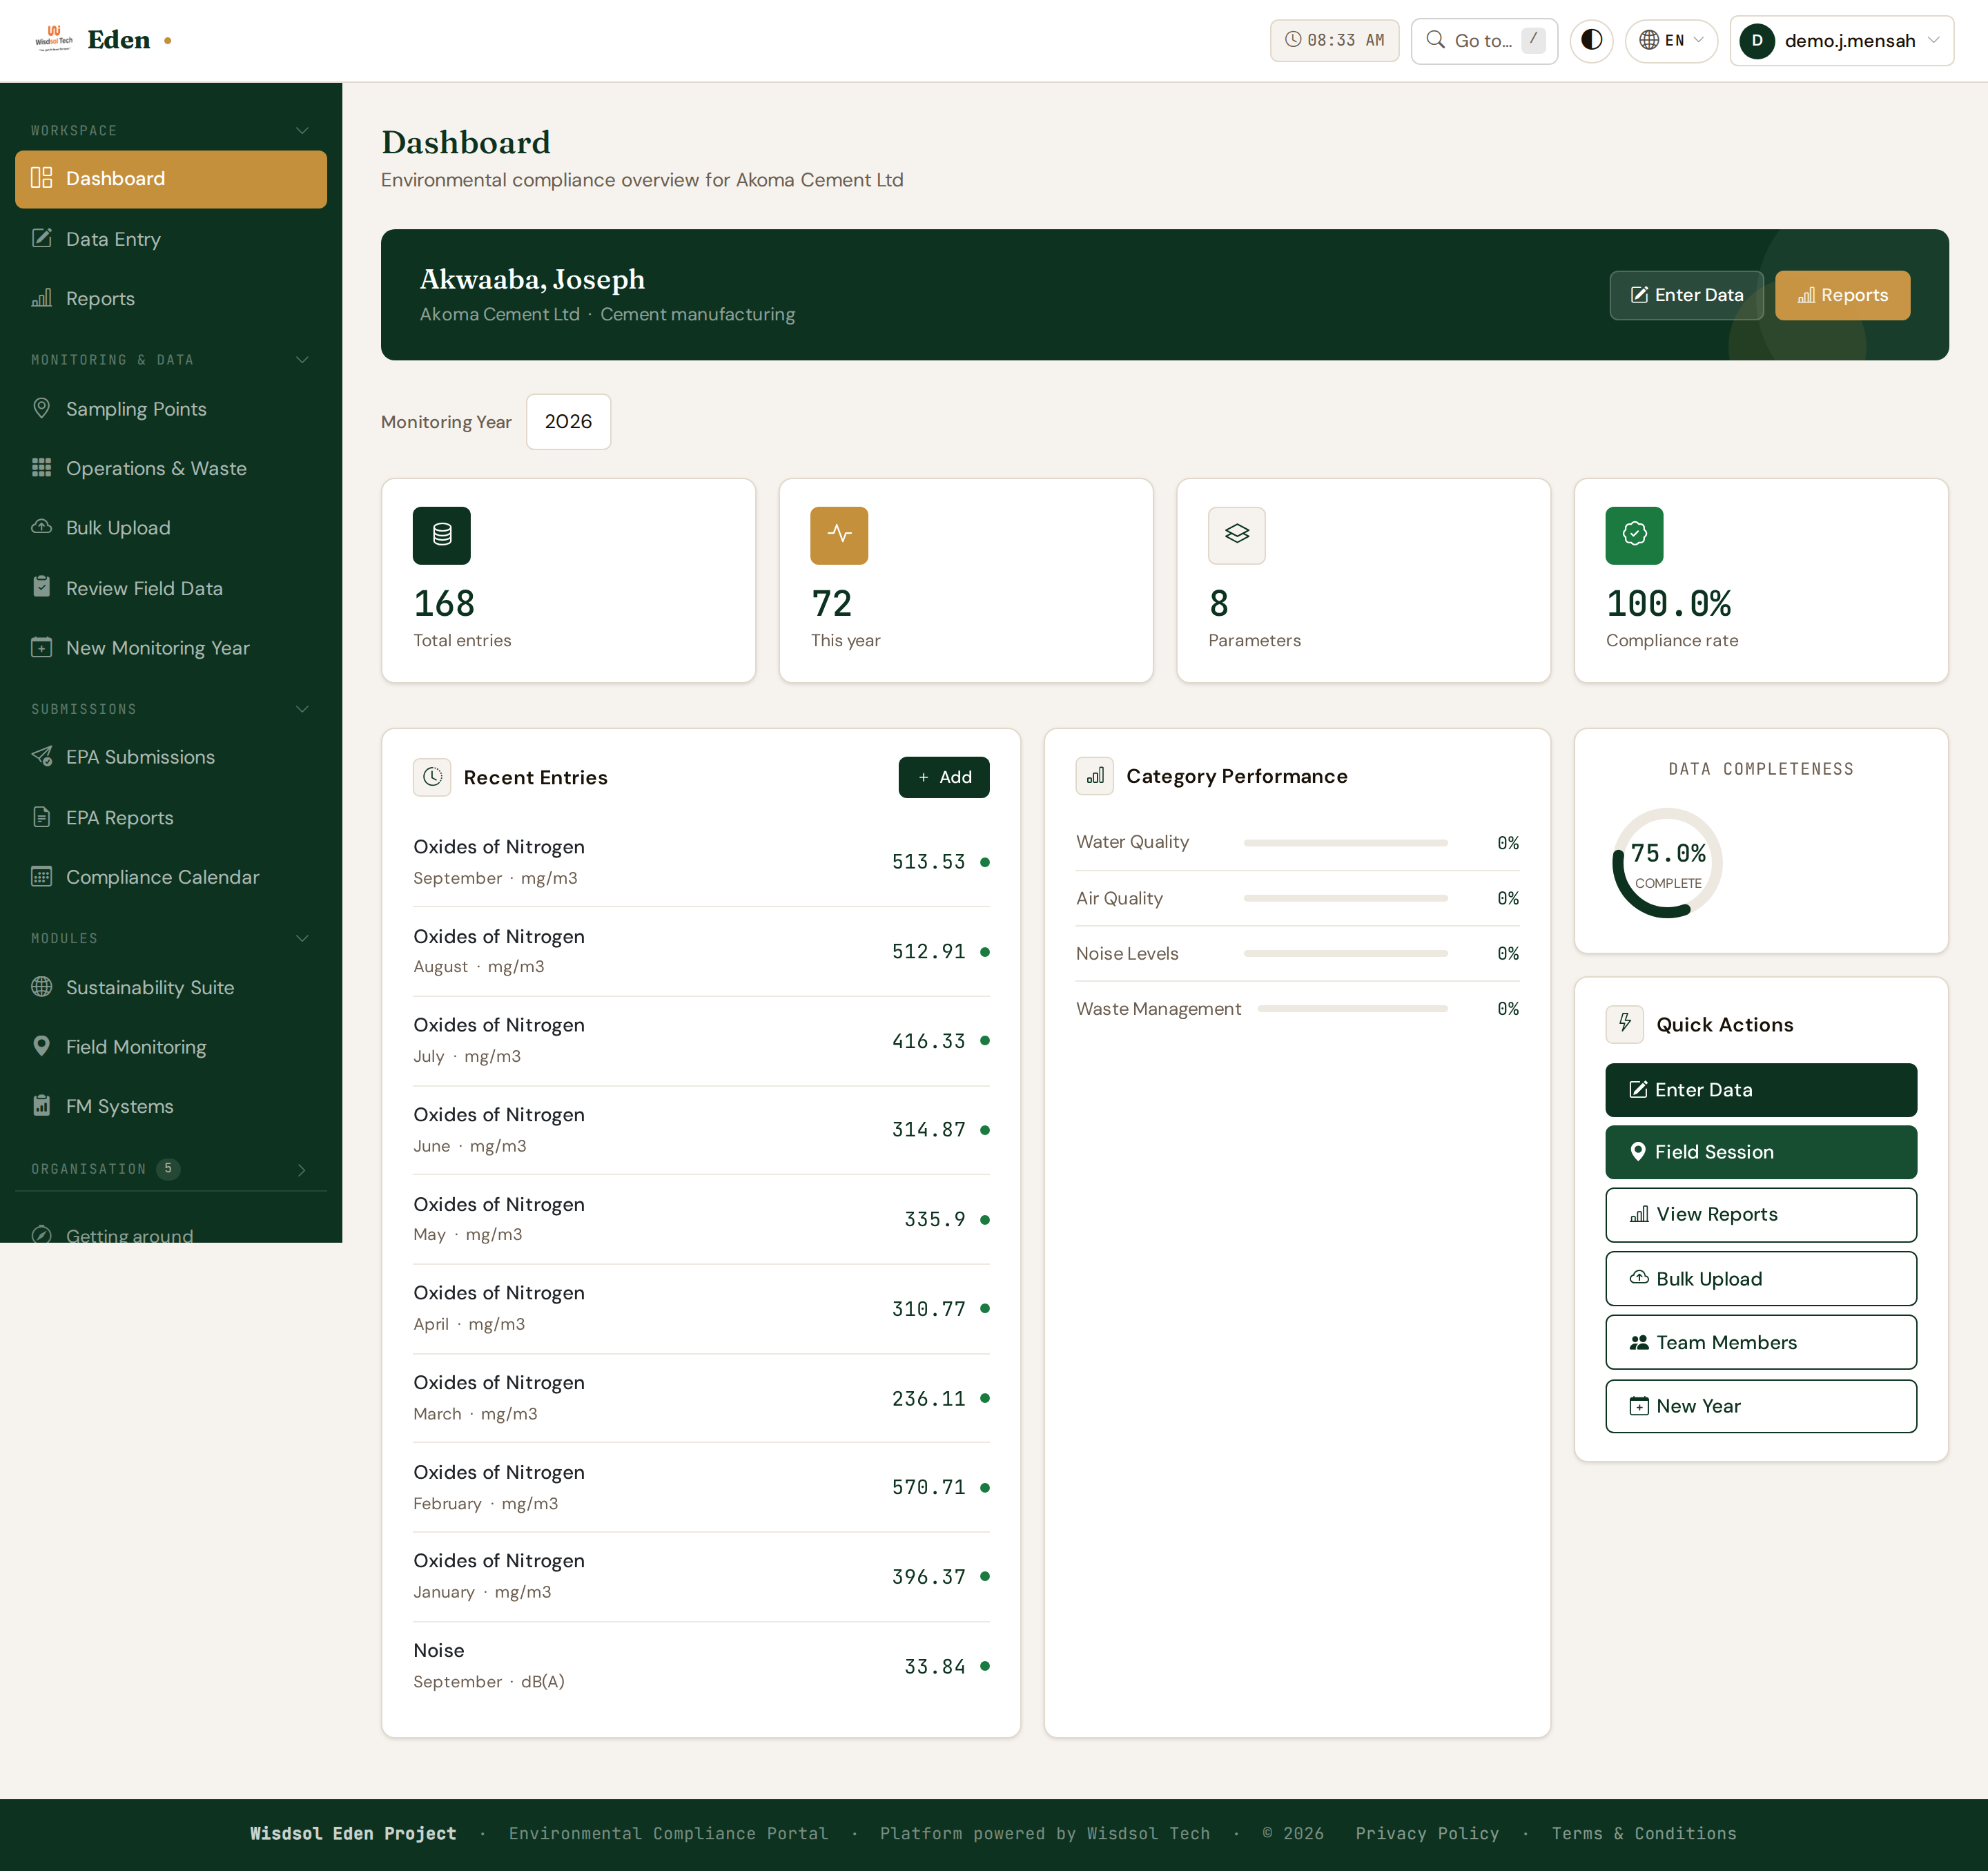
The dashboard is the answer to "where do things stand?". It is the screen you
land on, and every figure on it is a link to the screen behind it.
Reading the dashboard
Across the top are the headline counts for the year you have selected. Below
them, three panels: what you last recorded, how each category is doing, and
how much of the year you have filed.
 1
2
3
4
5
1
2
3
4
5
What a company sees first. · /dashboard/
- 1The monitoring year everything on this screen refers to. Change it to look at a previous year.
- 2Your totals: how many readings you have recorded, how many this year, how many parameters you report on, and the share of them inside their limits.
- 3The last readings you entered, newest first — the quickest way to confirm that what you just typed went in.
- 4How much of the year you have filed. It counts only the months that have come due, so filing January and February in March reads as complete, not as a sixth of the year.
- 5The three things people come here to do. Enter Data is the one you will use most.
Do this
- Open Dashboard from the Workspace group.
- Check the Monitoring Year is the one you mean.
- Click Enter Data, under Quick Actions, to start recording.
Recording your monitoring
Readings are entered a category at a time, against the place they were taken.
So the order is: say where, say what, then fill in the months.
Say where first
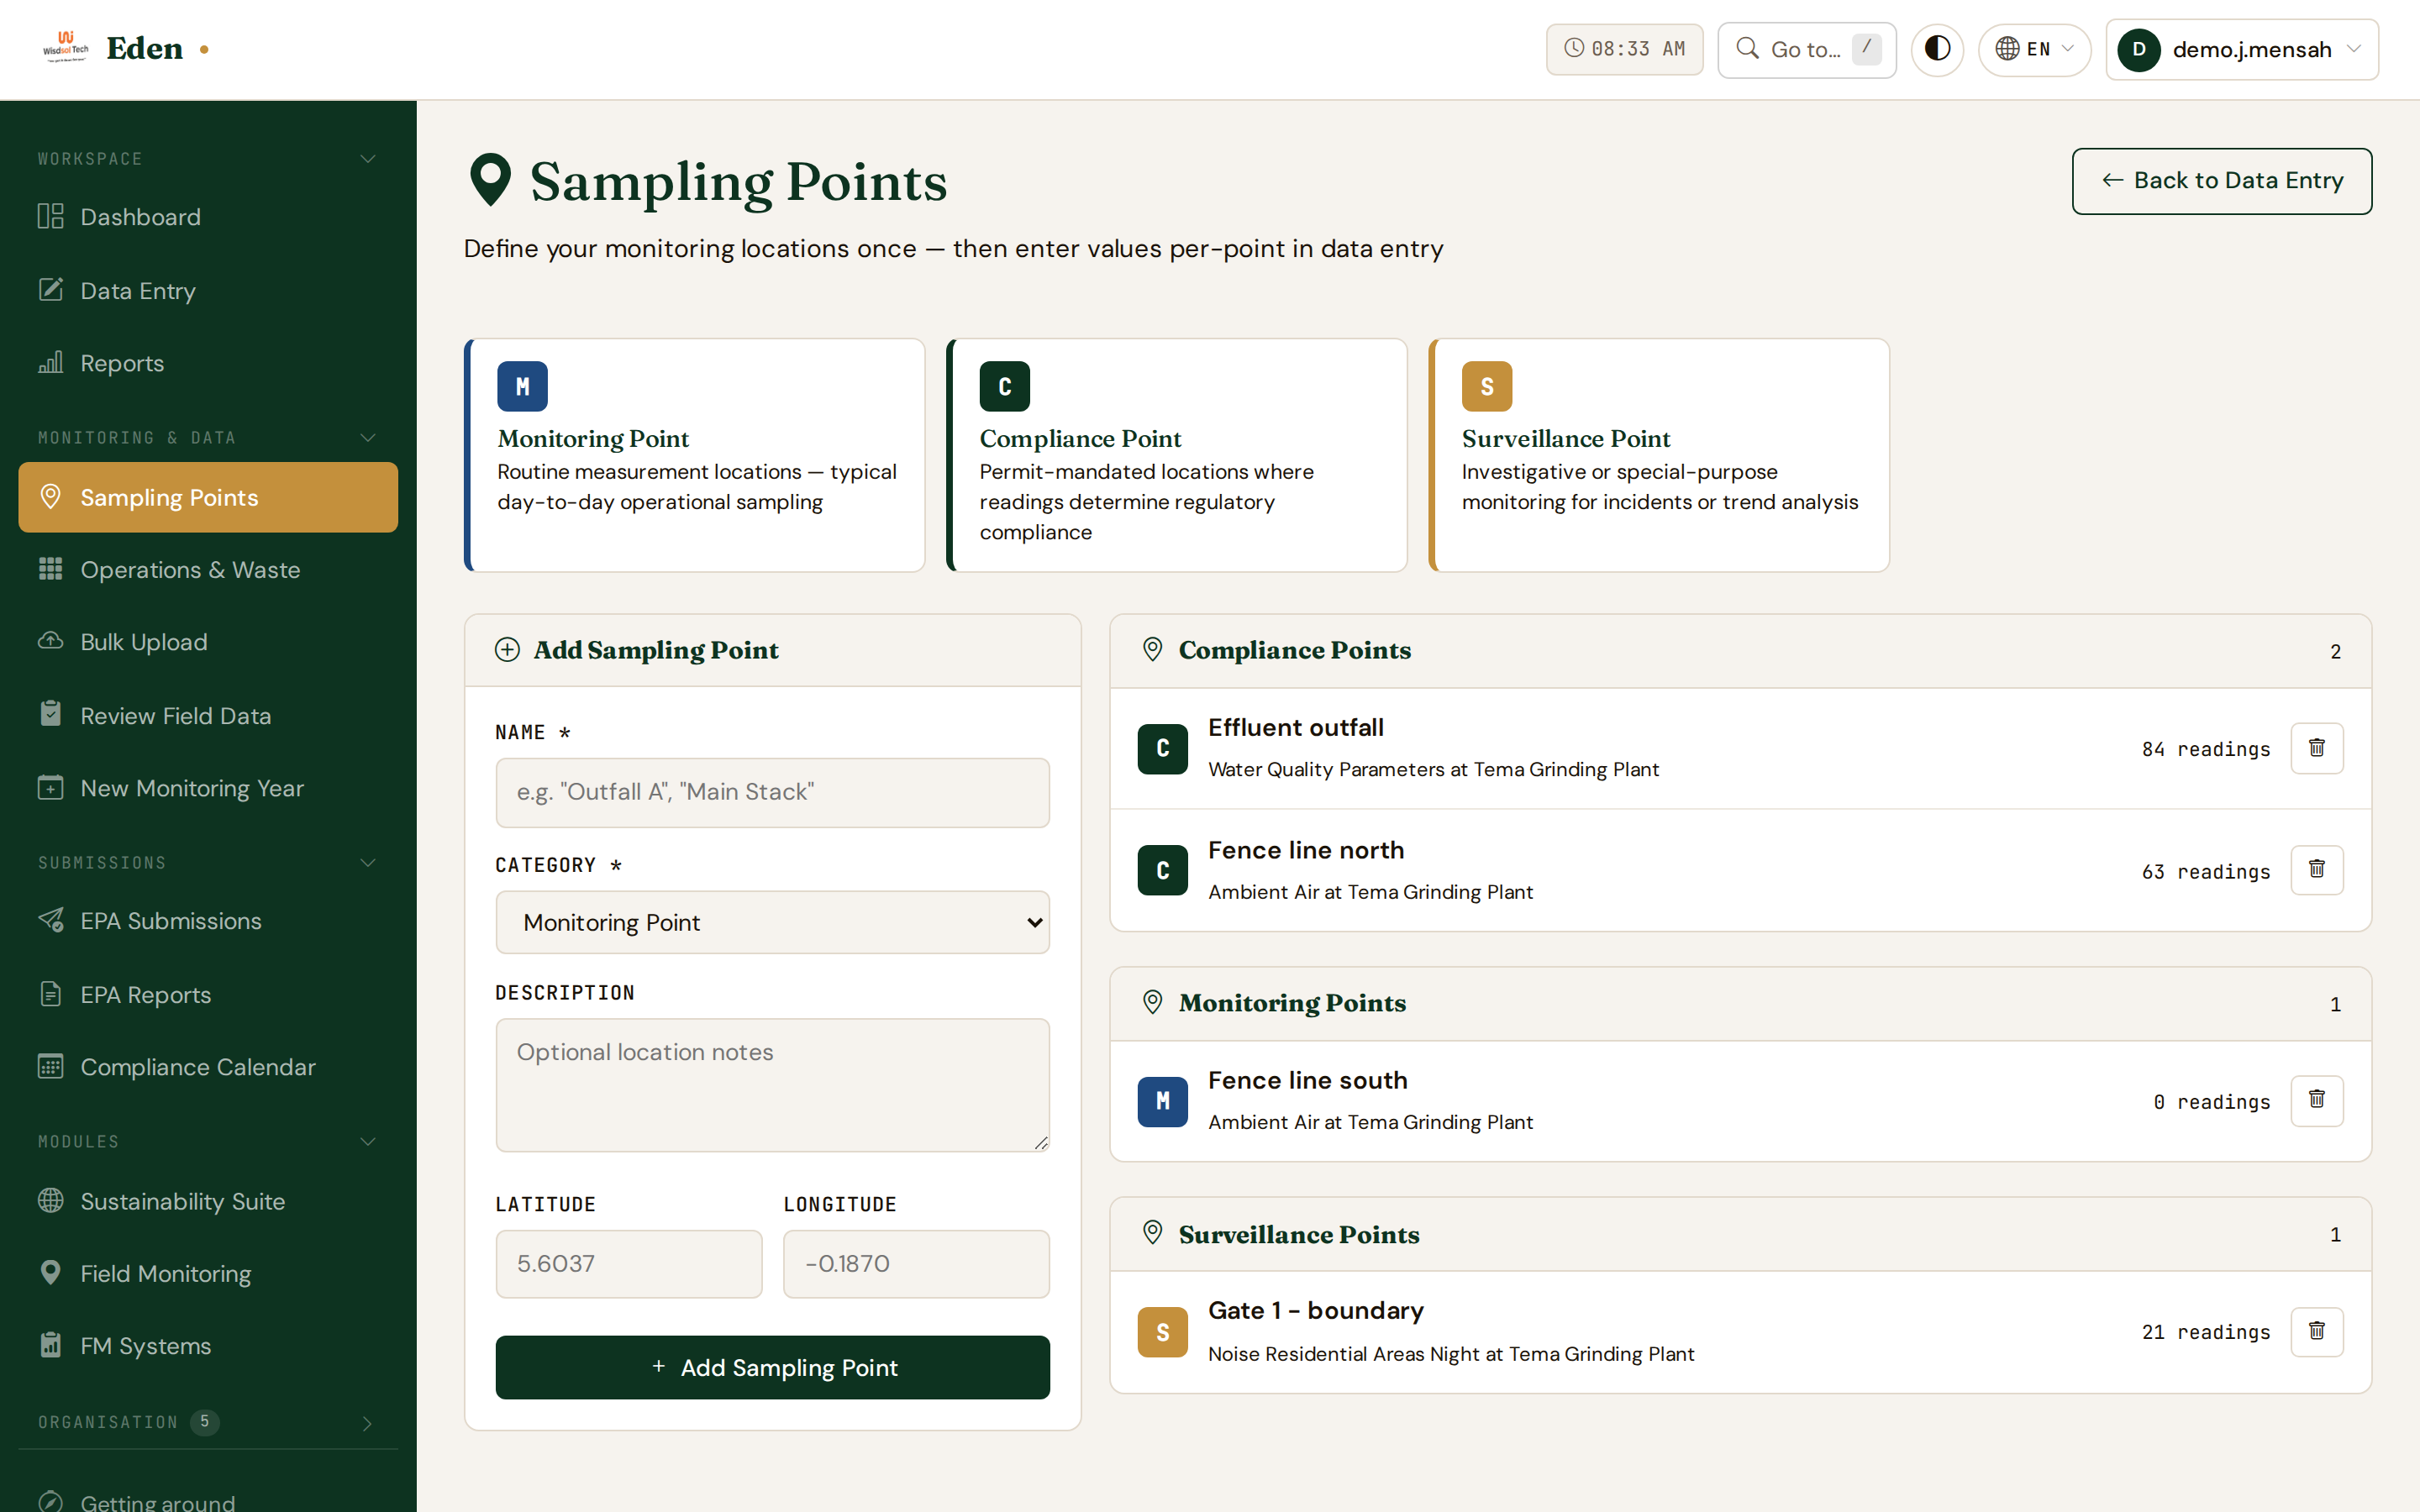
A sampling point is a place you measure — an outfall, a stack, a fence line.
You define each one once, and afterwards every reading is recorded against
one of them, which is what lets the same parameter have different values at
different places.
 1
2
3
4
5
6
1
2
3
4
5
6
Sampling points. · /data/sampling-points/
- 1The three kinds, and what each is for. Compliance points are the ones your permit requires, and they are the ones your regulator judges you on, so mark them correctly.
- 2The form for adding one.
- 3A name you will recognise in a list a year from now: "Outfall A", "Main stack".
- 4Which of the three kinds it is.
- 5Adds it. It is available in the data entry screen immediately.
- 6The points you already have, grouped by kind, with how many readings each one carries.
Do this
- Open Sampling Points, under Monitoring & data.
- Fill in a name and choose the kind.
- Add the coordinates if you have them — they are optional.
- Click Add Sampling Point.
A point that already has readings against it cannot be deleted; Eden disables
it instead, so the history stays intact and the point stops appearing in the
picker.
Then enter the readings
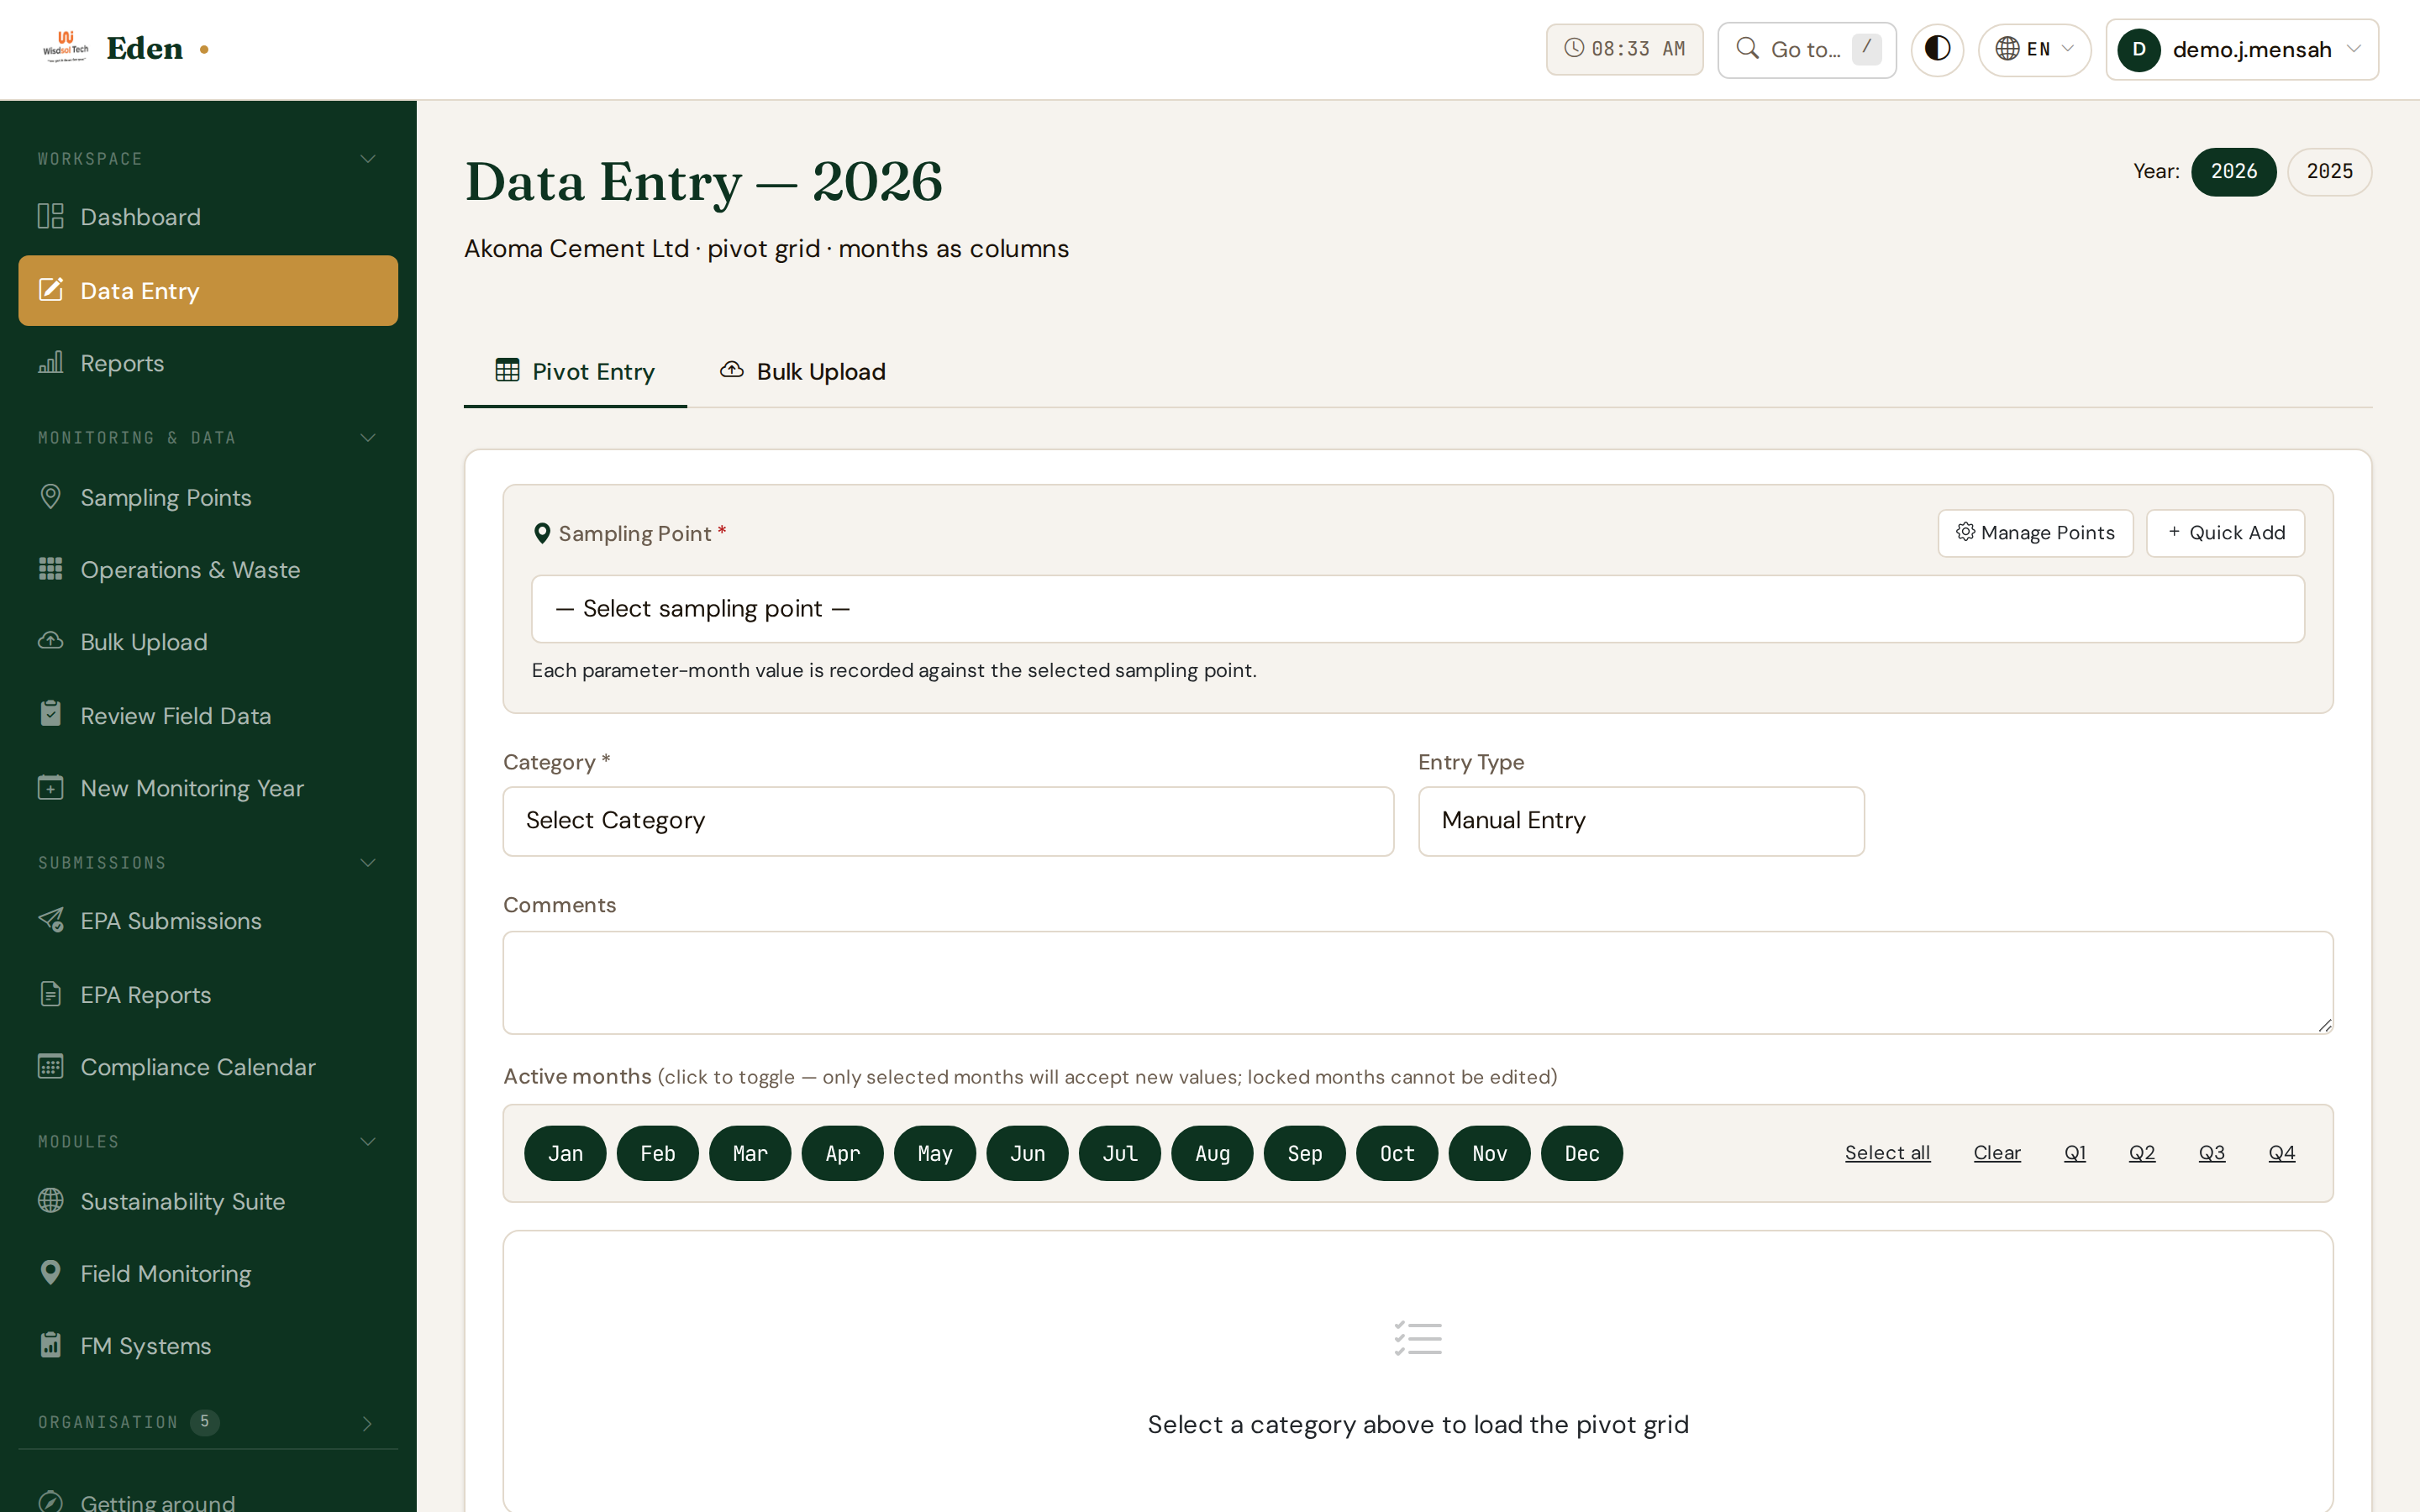
Data entry is a grid: parameters down the side, months across the top. You
choose the point and the category, and Eden builds the grid for what that
combination requires.
 1
2
3
4
5
6
7
8
9
10
1
2
3
4
5
6
7
8
9
10
Entering a month of readings. · /data/entry/
- 1The year you are filing for. Switching years switches the whole grid.
- 2Type the values in by hand.
- 3Or upload a spreadsheet instead, if you keep the readings somewhere else already.
- 4Where the readings were taken. Required: every value belongs to a place.
- 5Opens the sampling points screen, if the place you need is not in the list.
- 6Adds one without leaving this screen — useful when you discover a new location halfway through.
- 7Which set of parameters to show: air emissions, wastewater, noise, and so on.
- 8Whether these are your own measurements or come from somewhere else.
- 9Which months this entry covers. Click a month to include or exclude it; the quarter buttons do three at a time. A month already locked by a submission cannot be changed.
- 10The grid appears here once you have chosen a category.
Do this
- Open Data Entry, under Workspace.
- Choose the sampling point.
- Choose the category — the grid loads underneath.
- Click the months you are filing for.
- Type the values and save.
Values are saved as you go, so losing the page does not lose the typing.
Operations and waste
Some of what the regulator asks for is not a monthly reading: production
figures, waste movements, incidents. Those go on their own screen, under
Operations & Waste.
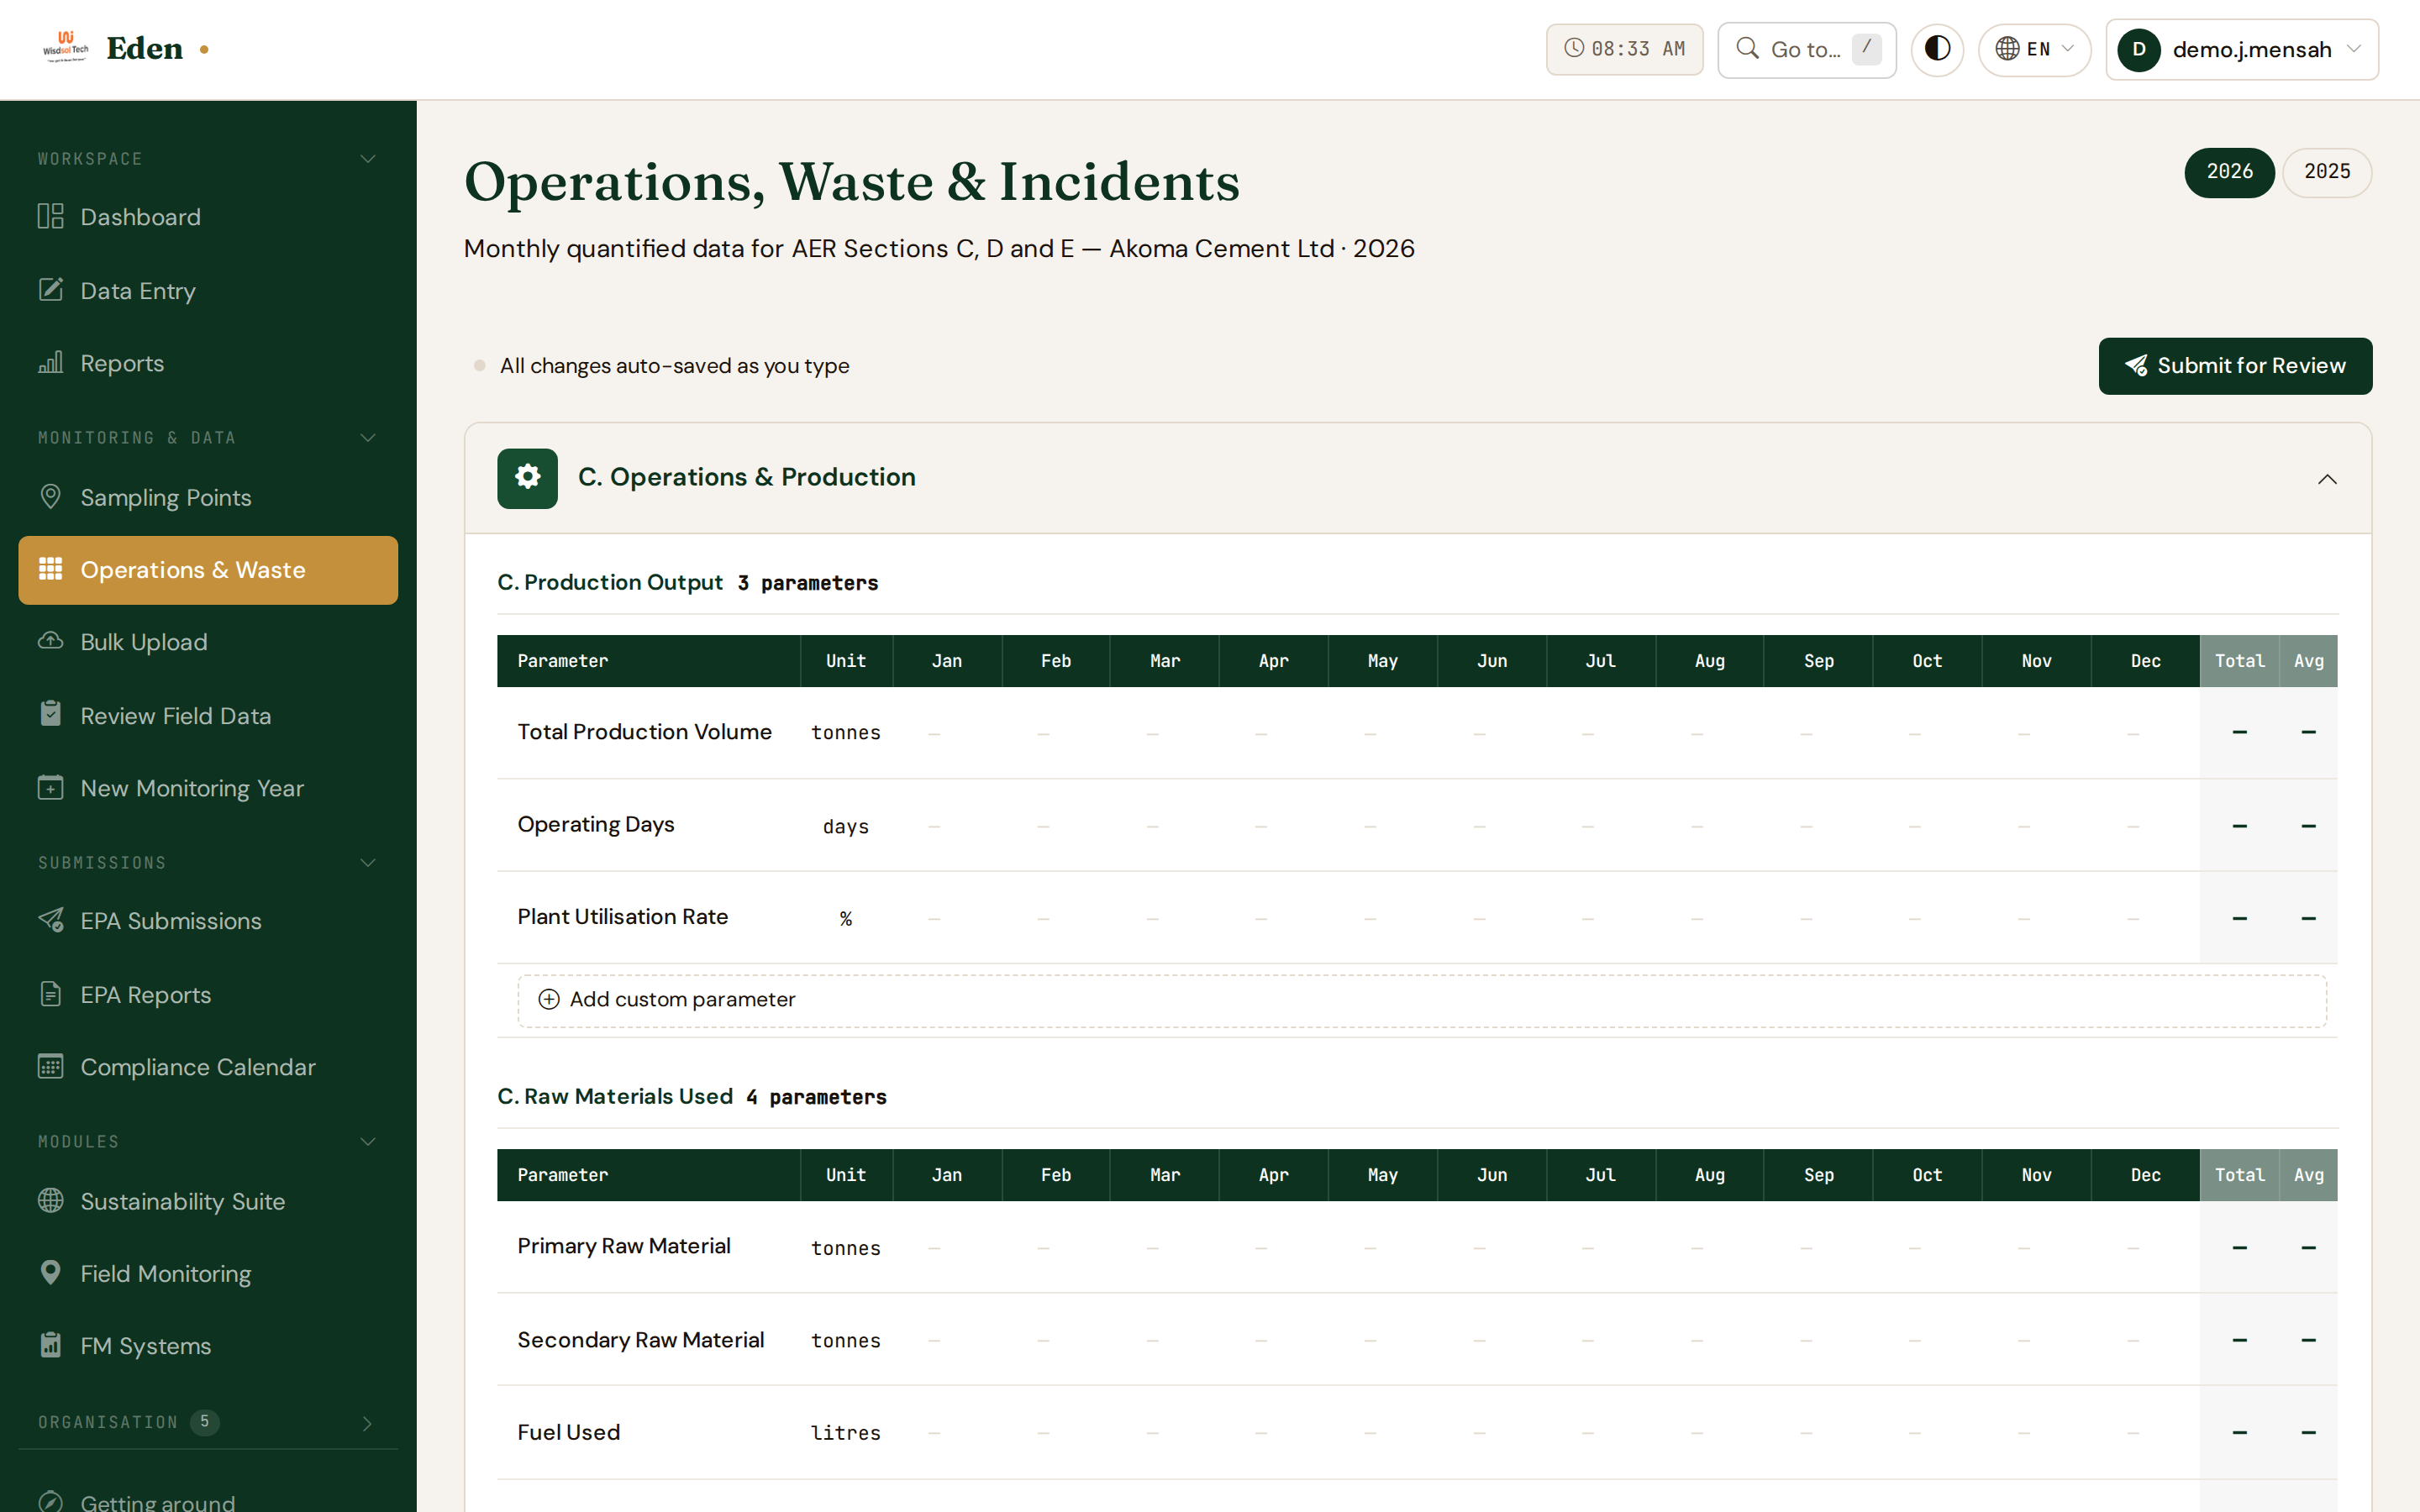
Operations and waste, sections C, D and E. · /data/sections/
Do this
- Open Operations & Waste, under Monitoring & data.
- Fill in the sections that apply to your undertaking.
Filing with your regulator
Recording readings is not the same as filing them. A submission is the formal
act: it packages a period's data, sends it to your regulator, and locks what
it covers so the figures cannot move after they have been looked at.
Making a submission
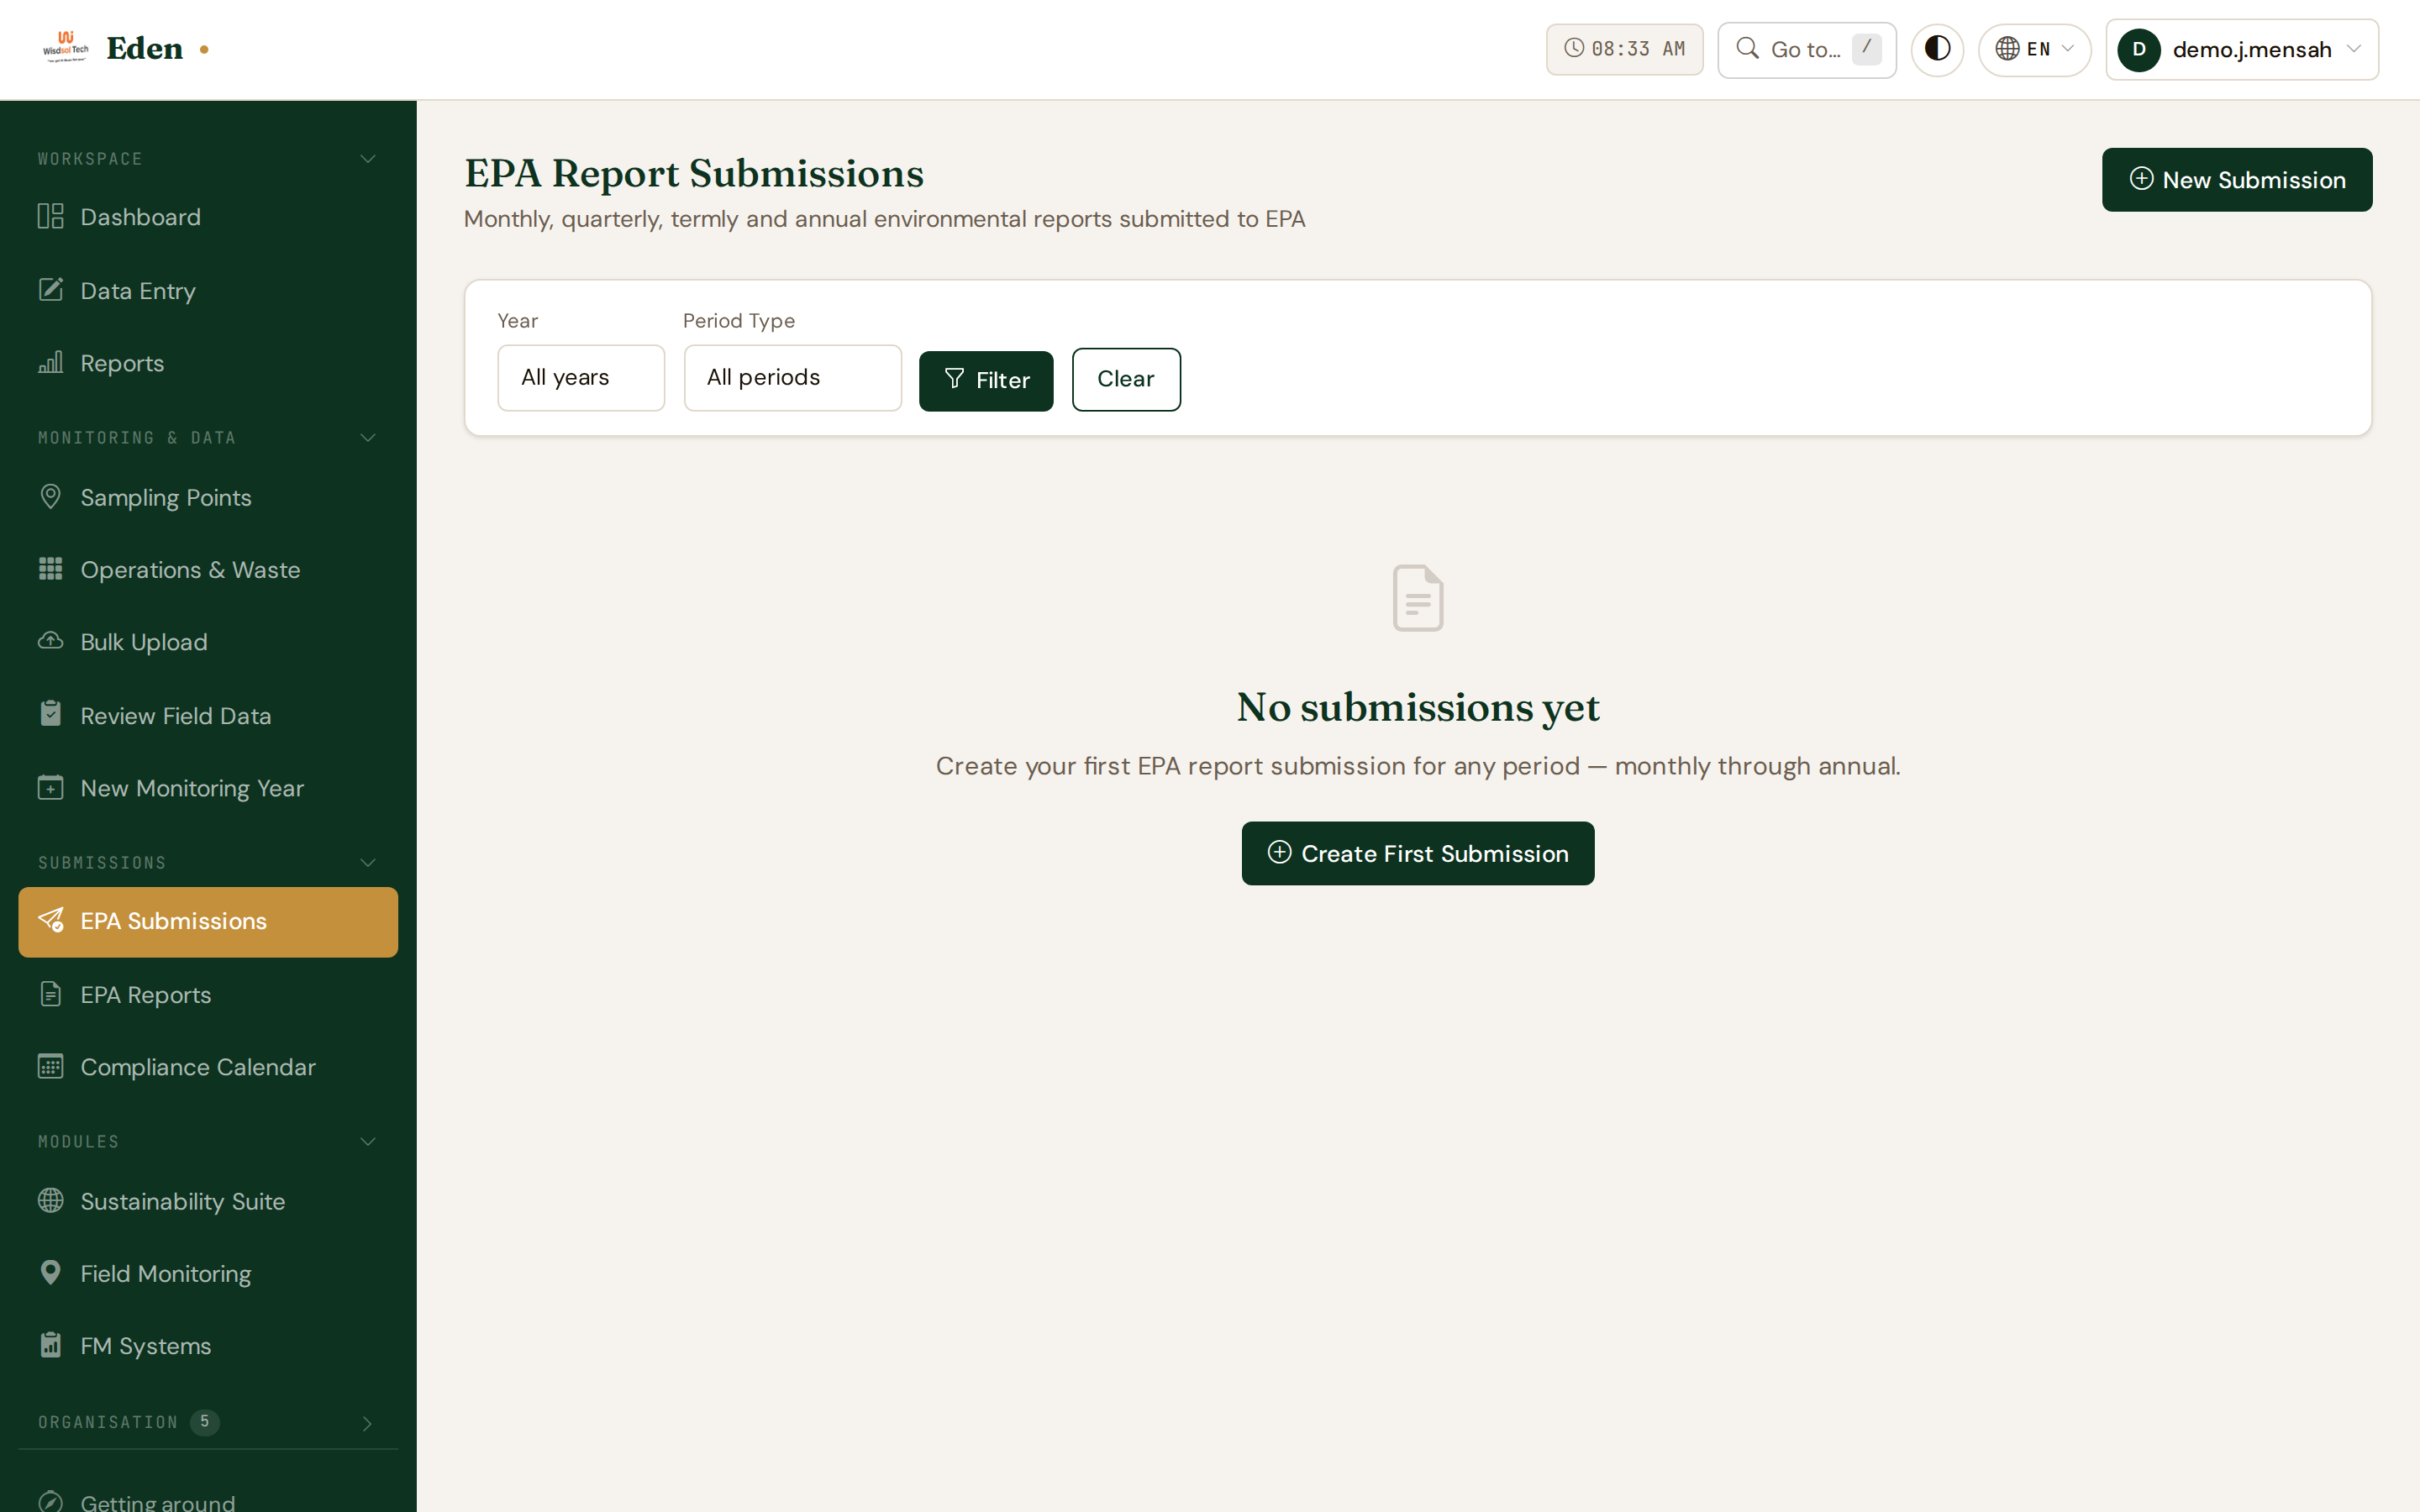
This screen lists everything you have sent and where each one stands. Before
your first one it is empty, as here.
 1
2
1
2
Submissions to the regulator. · /submissions/
- 1Starts a new submission. You choose the year and the period, and Eden gathers what you have recorded for it.
- 2Your submissions, with the status of each: draft, submitted, accepted, or returned for correction.
Do this
- Open EPA Submissions, under Submissions.
- Start a new one and choose the year and period.
- Check what it has gathered, then submit.
Once a submission is accepted, the months it covers are locked. If something
in a locked month is wrong, ask your regulator — they can unlock it. Working
around a lock by entering the correction somewhere else makes the record worse,
not better.